I consider myself to be a pretty resourceful and thrifty person. These attributes have been honed as a result of the dirtbag lifestyle. As I have been living day to day and going through the rigors of life on the road I have realized that there are certain lessons learned that I would like to share. As a result I plan to do little installments on how to make ends meet. Give me a toothpick and a chewed up wad of bubble gum and I will give you a can opener. Modern day MacGyver but instead of the flowing man mane think bitching beard.
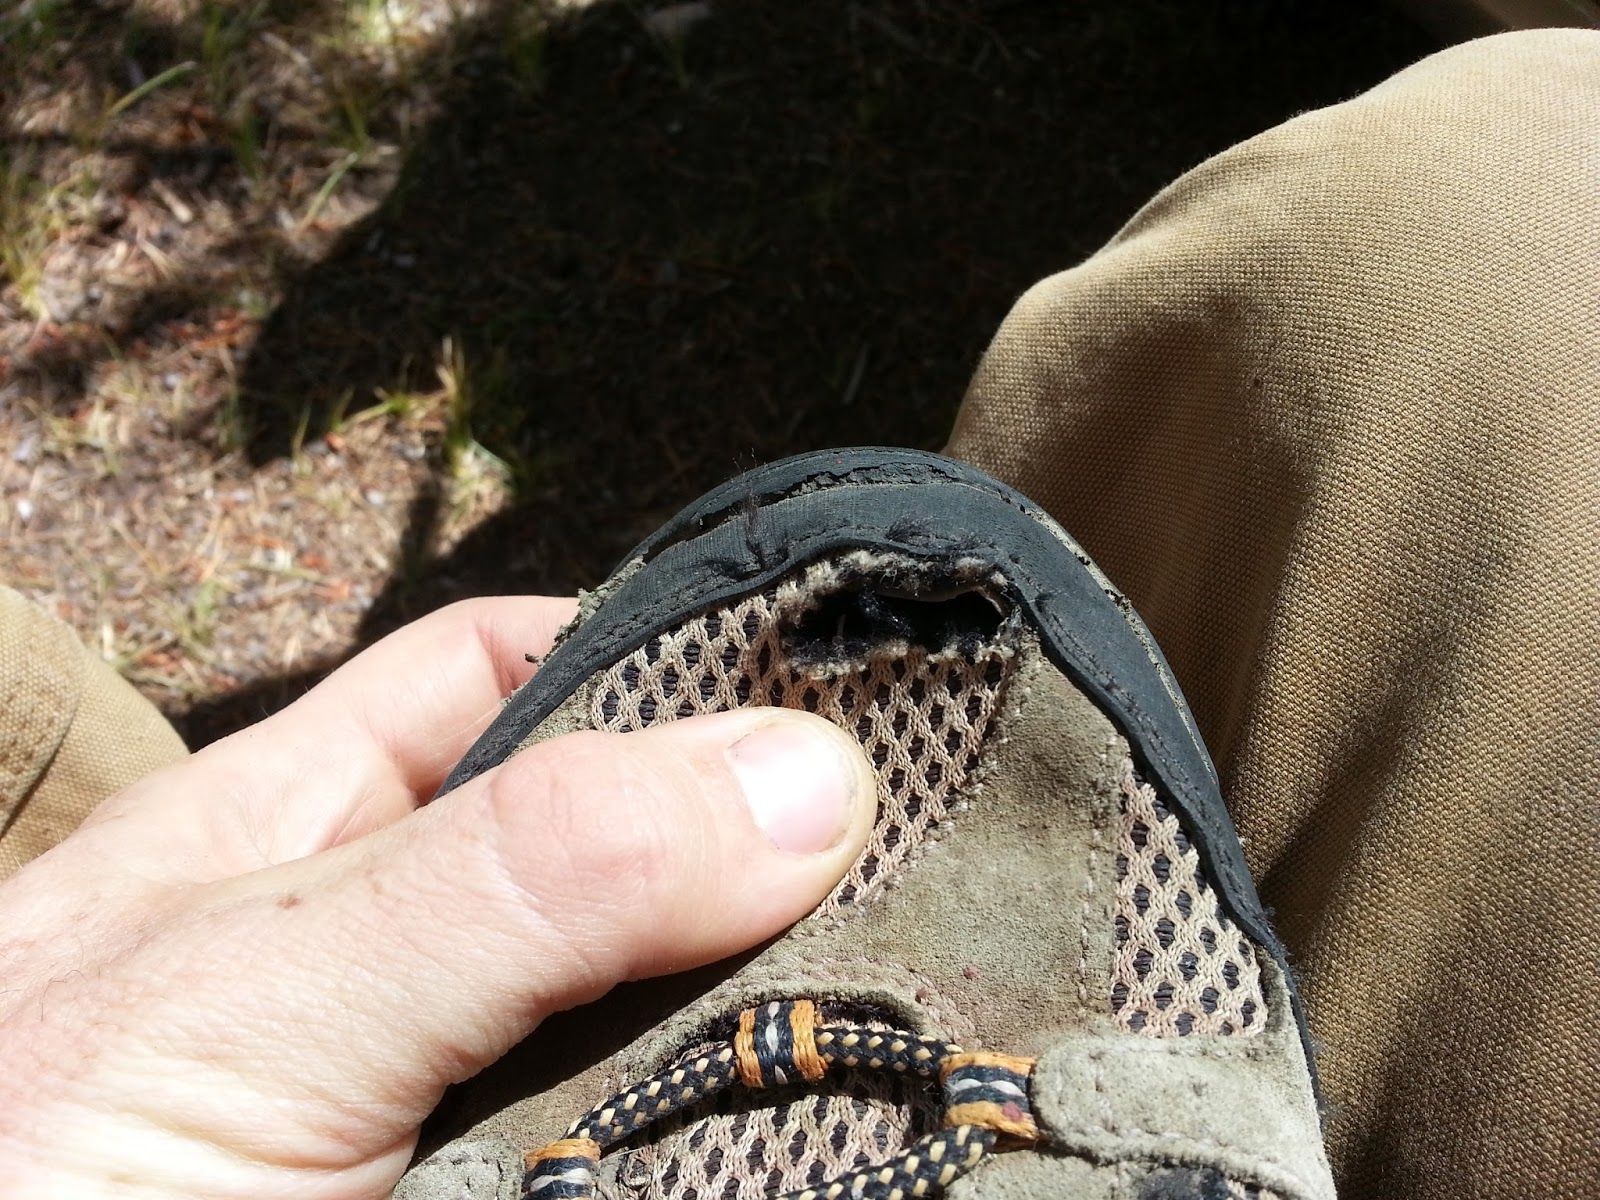
After summiting Huron Peak today I have 30 rocks to my climbing cairn. I would say notches in something but there isn't much wood around over 14,000 feet. With that many miles and vertical feet my shoes have all but started to implode. Any sane person would have already retired my one pair of trail shoes and truth be told I almost wrote them off as well. With two gaping holes and a chunk torn out of the sole in one shoe alone I made my hiking boots the primary pair. Alas, existing minor damage quickly exacerbates into full blown carnage while hiking for hours on end on a daily basis. As I quickly approached the point of no return with my footwear I decided it was time to resurrect. Below are the before surgery photos.


I had seen and heard of Shoe Goo but never used the product personally. I was down to try just about anything that was cheap and readily available so I picked some up at the local hardware store and went to town. After two seconds of looking around on the ground I found a handy dandy applicator.

This stuff is potent. They say to use in a well ventilated area, listen to that advice. Otherwise you're going to be baking out whatever room you're in like the bad kid in class back in 7th grade. Clean out all the nooks and crannies of what is getting glued together, you don't want to be sealing in any rocks and debris. This also makes for cleaner surfaces for the glue to work with. Next, you don't want to put gratuitous amounts on in one setting. Apply thin coats that dry faster. You can make multiple layers to build up thickness and strength.

I did this to help save the sides from grazing rocks while stepping down. I was beginning to shave off the leather and had a couple of decent gouges. It's not pretty, but this is dirtbag footwear 101. Next, I addressed the major concerns one at a time.

Be sure to weight your work down so the seams of the tear will bond together properly. I put this paper towel here so the goo wouldn't stick and dry to the rock. Here in the Colorado with low humidity and near perfect daytime curing temperatures these thin layers dried very quickly.
 |
| My state of the art drying station |


The toes of the boots required a bit more TLC while fixing. I managed to groundscore this wire from a trailhead parking lot. Hell yeah.
And after several passes with the goo and sufficient drying time your gear will look like this.


I repaired the large tear on the toe of my trail shoes with a patch of pants material salvaged from my blown out pair of Mountain Khakis. I would have salvaged them as well but they were too far gone for my sewing skills. I knew they would come in handy.

I used the boots today and everything held together just fine. Only the test of time will really tell though.
*UPDATE* 9/15/13 - The tests of time have been told at this point. My regular trail shoes got kicked aside after this attempt to salvage them. There were several unpleasant pressure points due to the location of the necessary repairs. I knew that this was a risk but like I mentioned earlier, it was trying this or the trashcan. In hindsight the application over the spot where the tread was torn off would have been fine. Also, I have used the smallest sized zip ties on fabric holes and tears at the seams on a similar pair of Merrels I owned in the past. With that particular repair I never got any pressure points and the shoes lasted for several months after that. I salvaged the shoe laces to use for my food bag string and then promptly sent them off to that great big dumpster in the sky.
My boots have held up rather well after the goo. It certainly breathed some new life into them after all. After hiking every day and having the boots exposed to the extra UV light at elevation the goo started to flake and peel off. It started first on the sides and then moved in towards the more critical parts on the toes. Monsoon season came about and ended up being an unusually longer and wetter one compared to my past summers in Colorado. The goo packs a powerful punch to the nostrils and there was no way I was going to try and apply this stuff and then have the boots hanging out in the car with me when I'm ducking out of the rain. The first application lasted around 3 weeks. I put some more on but it pretty much laughed its way off after a couple of wet, mucky days. My boots are sad ghosts of their former selves. Floppy bits of shoe goo are hanging off with mismatched laces and they are still wet from two days ago with trail juices undoubtedly starting to ferment inside. My feet are sad some days after miles of hiking but the home stretch is in sight and these guys will carry me across the finish line. The moral of this story is that even when you think equipment is done for you can still get resourceful and creative and keep on trucking.
you ROCK xo
ReplyDelete